how i added customized open graph image generation to my rust blog!
update (2025-07-14): this post is now outdated, as i have switched to using typst for open graph image generation.
happy new year!
i’ve been working on a new feature for my website, being open graph images generated at build time.
what is open graph?
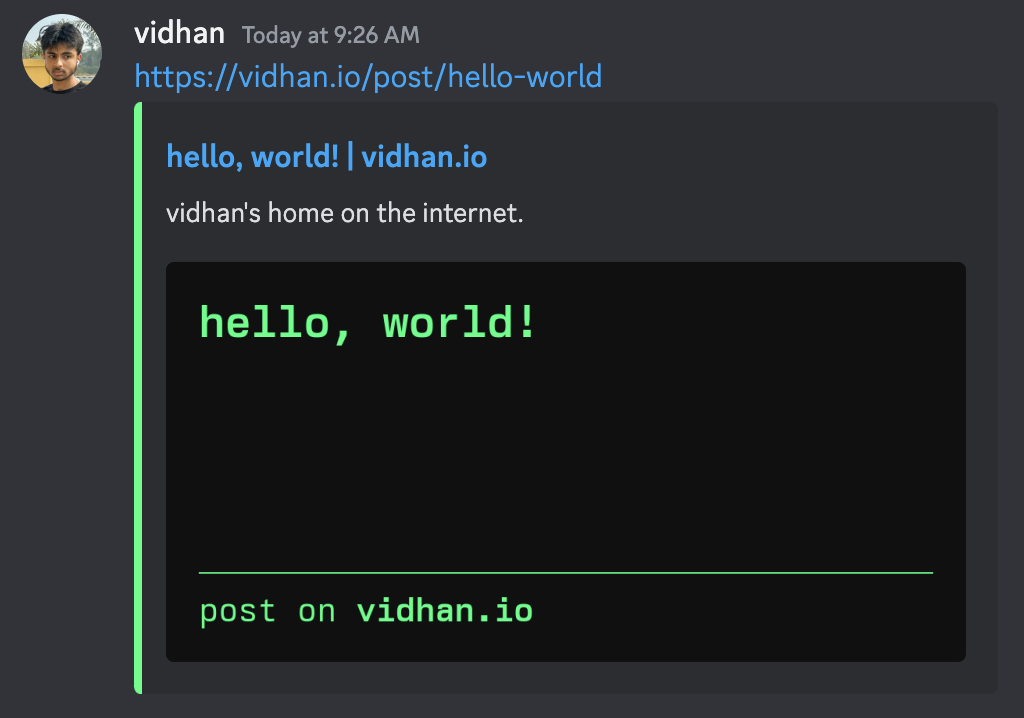
open graph is a protocol for specifying rich metadata for websites which can be rendered on supported platforms when you send a link to the site. you’ve probably seen this on twitter or discord.

goals
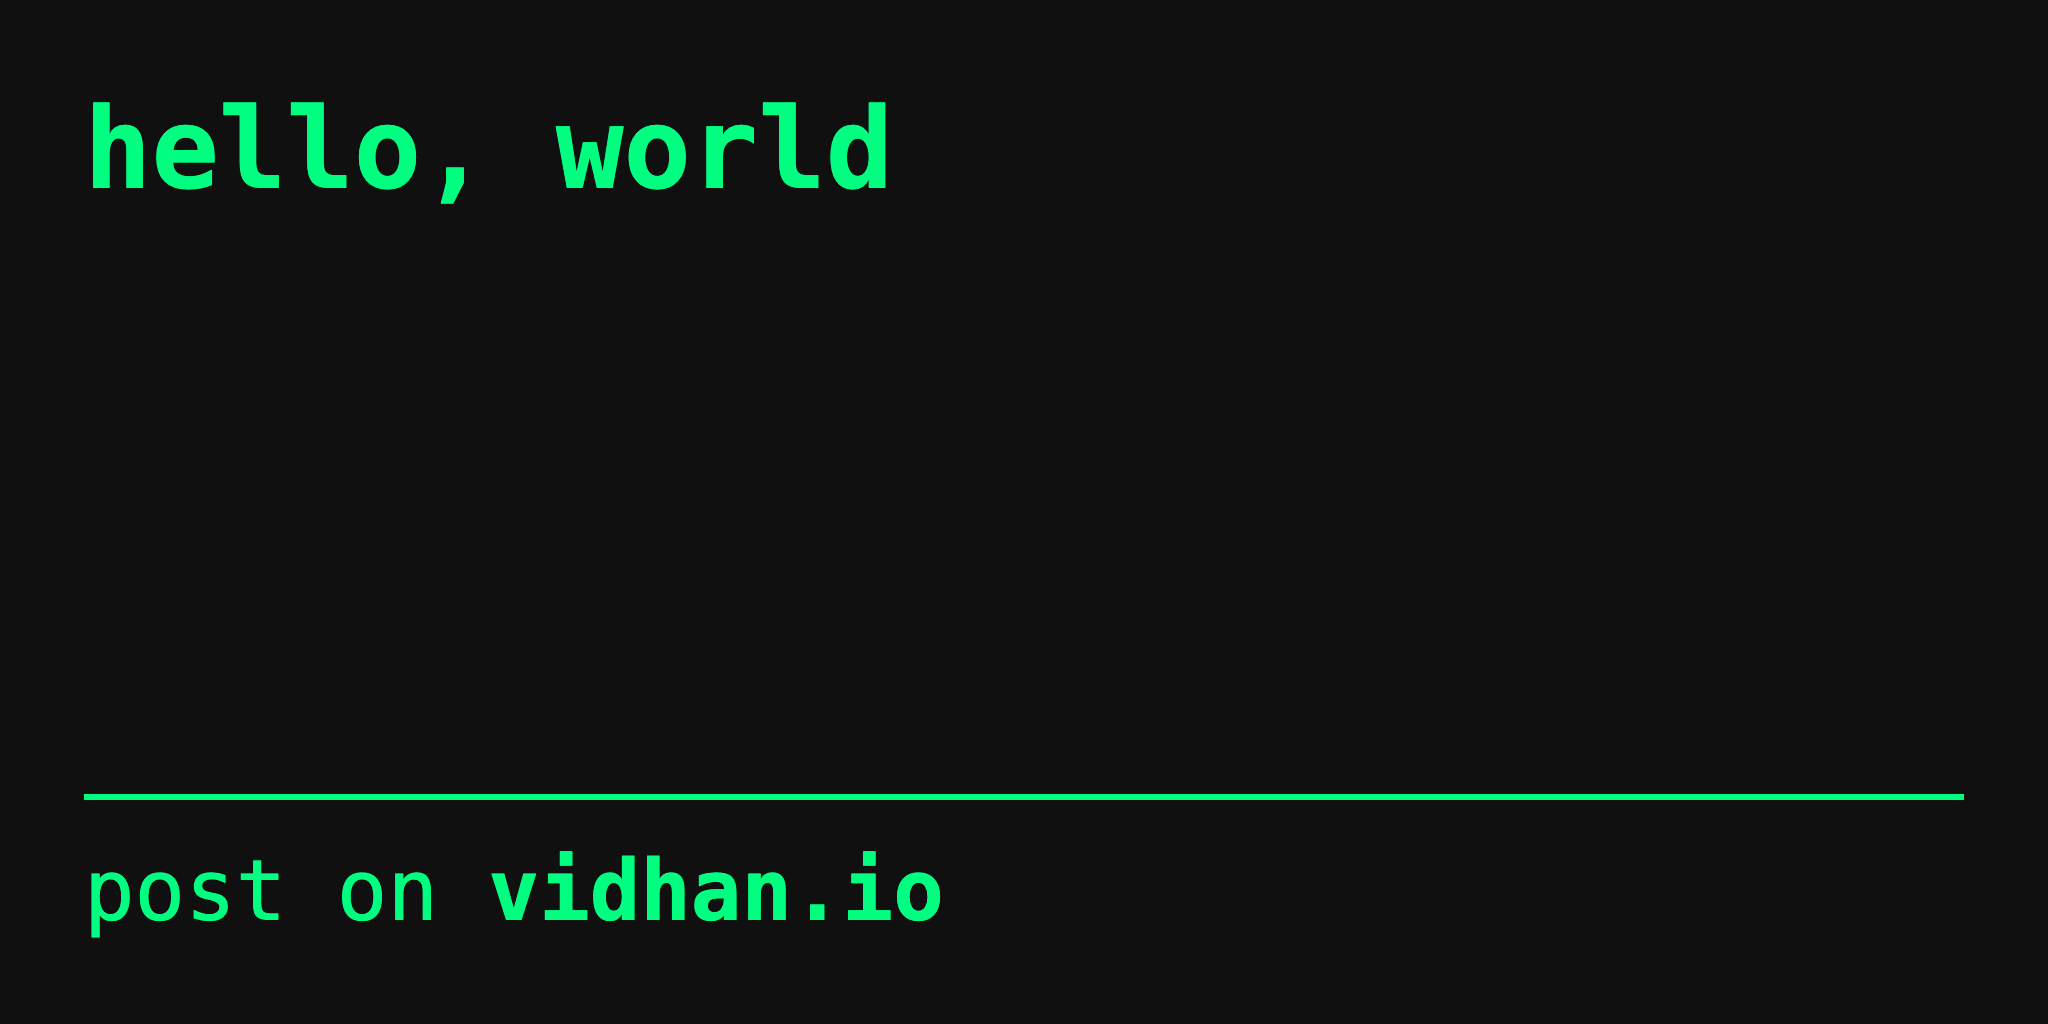
- a general simple “vidhan.io” graphic for my site
- a custom generated graphic for each blog post with the title and a footer with “vidhan.io” on it
- all of this generation to happen at build time[1]
considerations
i considered using the rust library image for this task. i had used it before, and the api wasn’t too bad. the only real hassle was using text with this library. for that, you had to use its sister library, imageproc. the main downside is that text flow is completely unhandled by this ecosystem. this means you have to write your own text wrapping logic, and have to deal with calculating widths and breaking on whitespace etc. i decided to not go down this path again, and choose a slightly more esoteric, but fun approach.
my approach of choice was to use good old html and css to render the image. sounds pretty simple, right? so i went on to search for some library which could perform the seemingly simple task of rendering html and css to a png. i stumbled across wkhtmltoimage (or pdf), but unfortunately the project seemed completely abandoned, and from my understanding seemed to just be a wrapper around my actual chosen solution: just running headless chrome and taking screenshots of webpages.
the aforementioned “build time shenanigans”
so, i had a solution selected, now i needed an implementation. of course as mentioned prior, this all had to happen at build time, in my build/main.rs[2].
i chose to use the library headless_chrome as my browser api, because it didn’t require any async and also handled setting up the devtools protocol for you, whereas others required you to set it up manually.
first, i wrote up a little bit of css which mimicked the style of my actual site:
:root {
  box-sizing: border-box;
  color: #00ff80;
  background-color: #101010;
  padding: 1.5rem;
  height: 100vh;

  font-size: 1.75rem;
  font-family: "Berkeley Mono", monospace;
}

* {
  box-sizing: inherit;
}

body {
  display: flex;
  flex-direction: column;
  height: 100%;

  margin: 0;
}

h1 {
  flex: 1;
  margin: 0;
}

footer {
  font-size: 1.5em;
}

hr {
  border: 0.0625rem solid #00ff80;
}
then, i wrote up a bit of html (using hypertext):
let html = maud! {
    (DOCTYPE)
    html {
        head {
            style { (Raw(include_str!("open-graph.css"))) }
        }

        body {
            h1 {
                (title)
            }

            @if let Some(footer) = footer {
                footer {
                    hr;

                    (footer)
                }
            }
        }
    }
};
then used the chrome library to navigate to the html using a base64 data url, then took a screenshot and saved it to the $OUT_DIR:
let tab = browser.new_tab()?;

tab.navigate_to(&format!(
    "data:text/html;base64,{}",
    STANDARD_NO_PAD.encode(html.render().into_inner())
))?;

let png_data = tab.capture_screenshot(CaptureScreenshotFormatOption::Png, None, None, true)?;

fs::write(out_dir.join(filename), png_data)?;
and then included the png data as a field in my generated blog post struct:
quote! {
    crate::post::Post {
        slug: #slug,
        title: #title,
        date: (#year, #month, #day), // this ↓
        image: include_bytes!(concat!(env!("OUT_DIR"), "/post-og/", #slug, ".png")),
        footnotes: &[#(#footnotes,)*],
        content: maud::Raw(#content),
    }
}
and finally served it in an axum route!
pub fn router() -> Router {
    Router::new()
        // ...
        .route("/post/{slug}/og.png", axum::routing::get(post_og_image))
        // ...
}

async fn post_og_image(
    Path(slug): Path<String>,
) -> SiteResult<(TypedHeader<ContentType>, &'static [u8])> {
    let post = Post::get(&slug).ok_or_else(|| SiteError::PostNotFound(slug))?;

    Ok((TypedHeader(ContentType::from(mime::IMAGE_PNG)), post.image))
}
and i had a pretty nice looking open graph graphic!
just one problem though, it was missing the wonderful font i use for the rest of my website, Berkeley Mono. the reason for this was that when i built this website in the docker image, it obviously did not have the font installed, so it couldn’t render it. the fix was pretty simple, i just installed the fonts in the dockerfile before the build process!
RUN mkdir -p $HOME/.local/share/fonts/ && cp ./fonts/*.ttf $HOME/.local/share/fonts/
and there we go, perfect, build time generated custom open graph images for my site!
closing
thank you for reading, i hope you enjoyed this blog post.
you can find all the code related to this endeavour on github!
footnotes
- [1] i’m hosting this entire website on google cloud run, which spins down the instance when there are no requests for a while. as such, fast startup time is of utmost importance, as i want to make cold starts as painless as possible. generating these at runtime on startup would take seconds of time until a user could load the page, when they could easily be generated at build time, as all the data is present then.
- [2] yes, my shenanigans have reached the point of splitting my build script into multiple files/modules. i handle all markdown -> html conversion at build time, as well as syntax highlighting!